
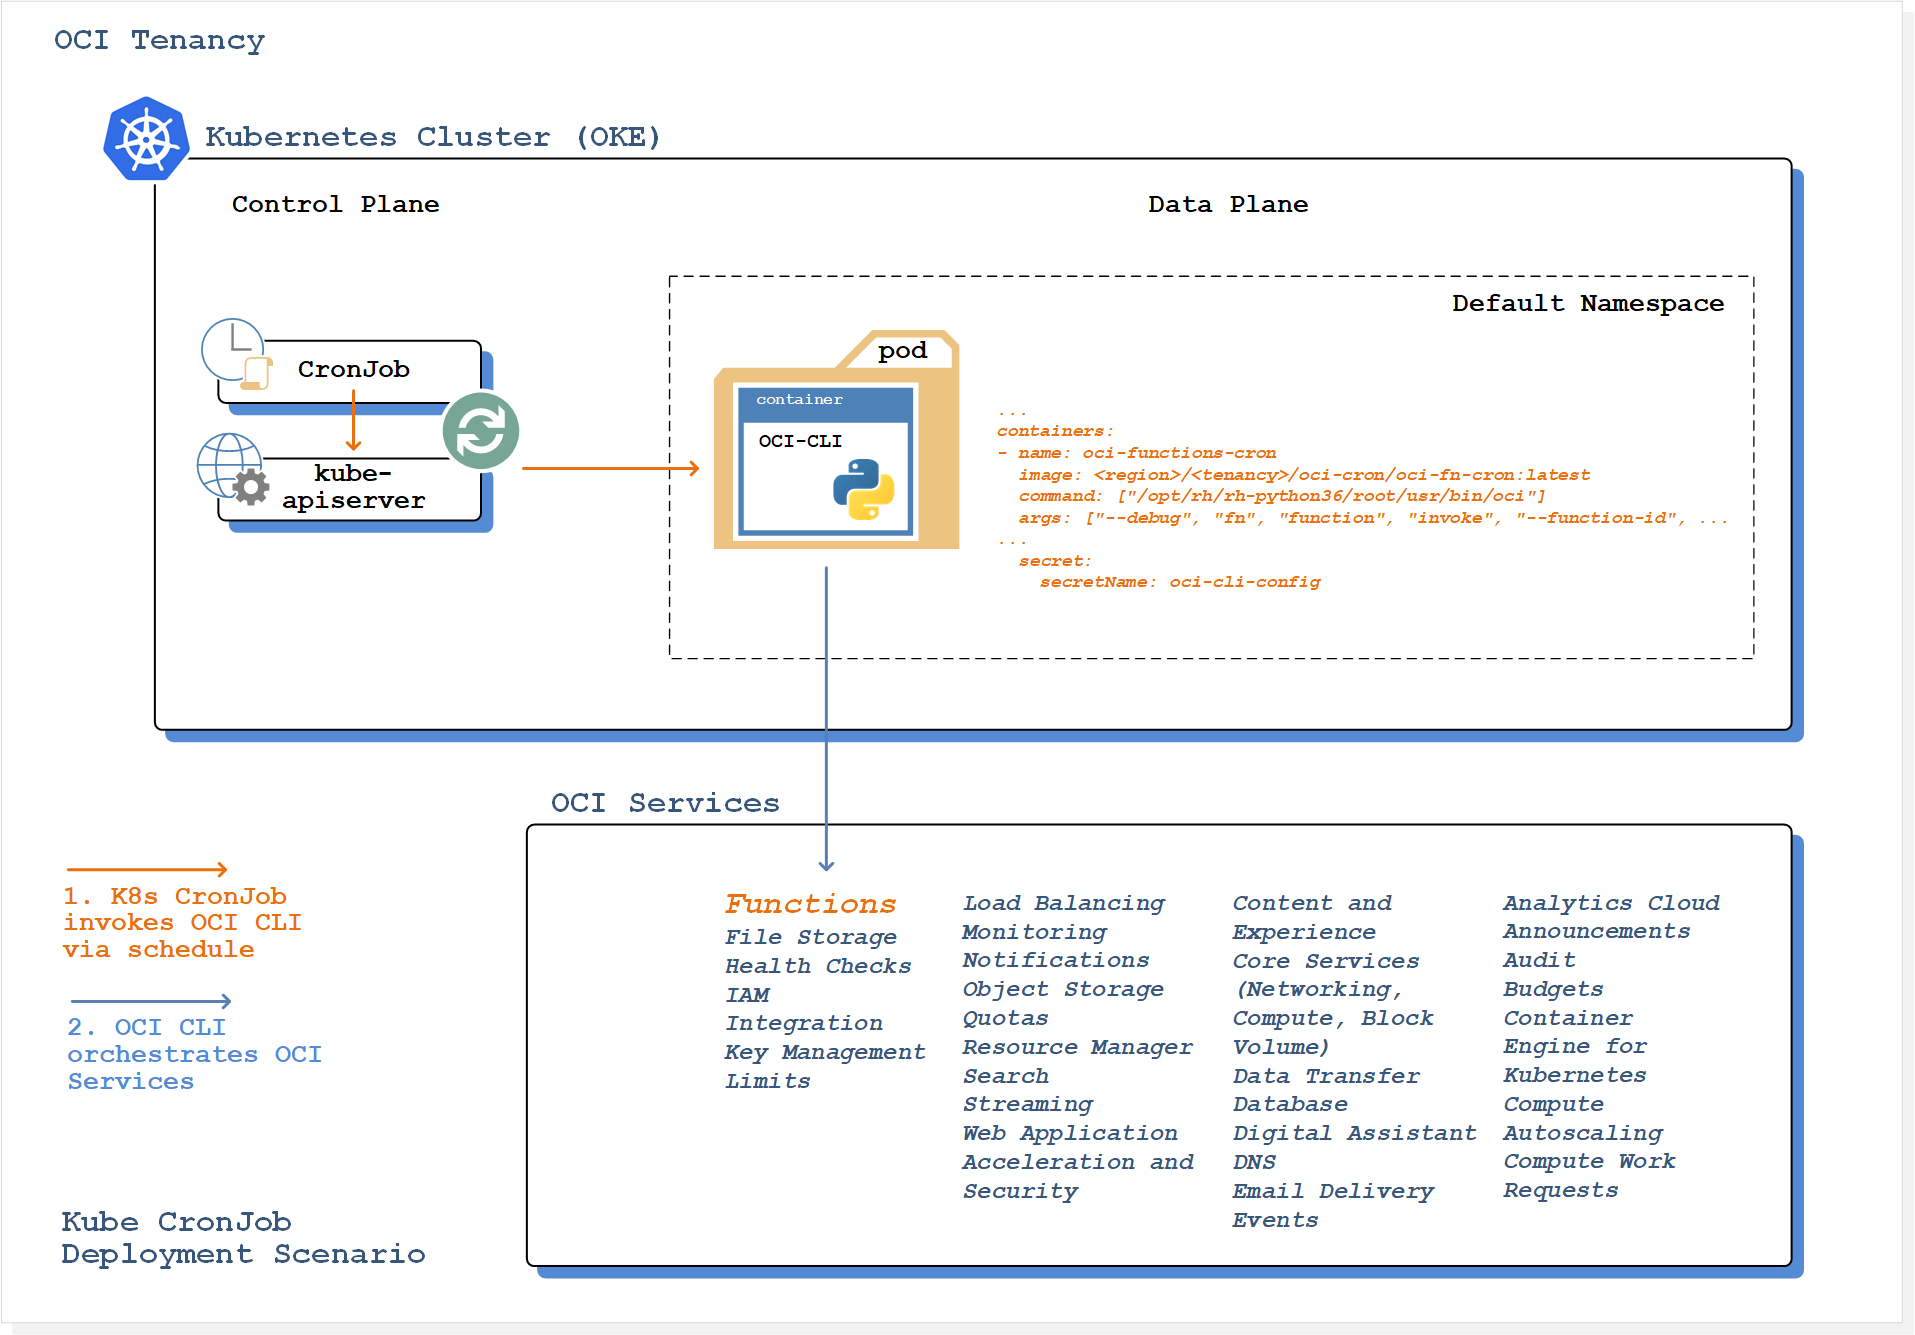
In this blog post I'll show you how to configure a Kubernetes CronJob to run Oracle Cloud Infrastructure CLI commands automatically, on a recurring schedule.
In the example solution, we'll be scheduling the invocation of an Oracle Serverless Function.

About Kubernetes CronJobs
It's common for developers and operators to have a range of different tasks scheduled to run automatically in the background. These scheduled commands or tasks are typically known as “Cron Jobs”.
Kubernetes supports the creation of CronJobs, which is a mechanism for configuring Kubernetes to run containerised tasks on a time-based schedule. These automated jobs run like Cron tasks on a Linux or UNIX system.
Cron jobs are useful for creating periodic and recurring tasks, like running backups or sending emails. Cron jobs can also schedule individual tasks for a specific time, such as if you want to schedule a job for a low activity period.
About the OCI CLI
The Oracle Cloud Infrastructure CLI is a powerful, and easy to use tool that provides the same core capabilities as the Oracle Cloud Infrastructure Console, plus additional commands that can extend the Console's functionality. The CLI is convenient for developers or anyone who prefers the command line to a GUI.
The CLI supports orchestration and configuration of many OCI services, including Core Services (Networking, Compute, Block Volume), Database, Load Balancing, Serverless Functions, and many more. The complete list of supported services is available here.
About Oracle Functions
Oracle Functions is a fully managed, highly scalable, on-demand, Functions-as-a-Service (FaaS) platform, built on enterprise-grade Oracle Cloud Infrastructure, and powered by the Fn Project open source engine.
With Oracle Functions, you can deploy your code, call it directly or trigger it in response to events, and get billed only for the resources consumed during the execution.
Oracle Functions are "container-native". This means that each function is a completely self-contained Docker image that is stored in your OCIR Docker Registry and pulled, deployed and invoked when you invoke your function.
Tutorial Overview
First, we're going to be building a container image containing the OCI CLI, then we'll configure a Kubernetes Secret to host your CLI configuration parameters and credentials.
Once we've pushed our container image to the OCI Registry, we'll schedule our containerised OCI CLI to invoke our Serverless Function via a Kubernetes CronJob.
Prerequisites
First, let's implement and configure the components that you need in order to deploy an OCI CLI command as a scheduled CronJob on Container Engine for Kubernetes.
You will need:
- An Oracle Container Engine for Kubernetes cluster that is up and running
- An Oracle Cloud Function provisioned in your OCI tenancy
- Oracle Cloud Infrastructure CLI and kubectl command lines installed and configured on your development workstation
Deployment Process
1. Create Kubernetes Secret
In the process of working through the prerequisites section, you will have installed and configured the OCI CLI on your development workstation. As a part of this process there was the requirement to configure the CLI config file, and OCI API private key.
We're now going to copy and store these artifacts inside a Kubernetes Secret, which will be used to authenticate the CLI to your OCI tenancy each time our scheduled task runs.
From your development workstation, run the following command:
kubectl create secret generic oci-cli-config --from-file=<oci-config-file> --from-file=<rsa-private-key>Substitute the values <oci-config-file> and <rsa-private-key> with the appropriate path directives to the files on your development workstation, e.g.
kubectl create secret generic oci-cli-config --from-file=./.oci/config --from-file=./.oci/ssh/id_rsa_pri.pemThe OCI config file and RSA private key will be automatically mounted into the container filesystem at the path /root/.oci at runtime.
As this is the default file system location for the OCI CLI config files, with no further configuration the CLI will use these files to authenticate to your OCI tenancy each time the scheduled task is invoked.
2. Build the CLI container image
Create a directory on your development workstation named oci-fn-cron and create a file named Dockerfile in the directory with the following content:
FROM oraclelinux:7-slim
ENV OCI_CLI_SUPPRESS_FILE_PERMISSIONS_WARNING=True
ENV PATH="/usr/local/sbin:/usr/local/bin:/usr/sbin:/usr/bin:/sbin:/bin:/opt/rh/rh-python36/root/usr/bin:${PATH}"
ENV LC_ALL=en_US.utf8
ENV LANG=en_US.utf8
ARG CLI_VERSION=2.6.14
RUN mkdir /oci-cli
WORKDIR /oci-cli
RUN yum -y install oracle-release-el7 && \
    yum -y install oracle-softwarecollection-release-el7 && \
    yum-config-manager --enable software_collections && \
    yum-config-manager --enable ol7_latest ol7_optional_latest ol7_addons && \
    yum-config-manager --disable ol7_ociyum_config && \
    yum -y install scl-utils && \
    yum -y install rh-python36 && \
    yum -y install gcc && \
    yum -y install wget && \
    yum -y install unzip && \
    rm -rf /var/cache/yum
RUN wget -qO- -O oci-cli.zip "https://github.com/oracle/oci-cli/releases/download/v${CLI_VERSION}/oci-cli-${CLI_VERSION}.zip" && \
    unzip -q oci-cli.zip -d .. && \
    rm oci-cli.zip && \
    pip3 install oci_cli-*-py2.py3-none-any.whl && \
    yes | oci setup autocomplete
ENTRYPOINT ["/opt/rh/rh-python36/root/usr/bin/oci"]
From the oci-fn-cron directory, run the following command to build the CLI container image:
docker build -t oci-fn-cron .3. Push the container image to the OCI registry
In this next step, we'll push the local copy of the image up to the cloud. For a great walkthrough on how to use the OCI Registry service, check out this article.
You will need to log into your Oracle Cloud Infrastructure console. Your user will either need to be a part of the tenancy's Administrators group, or another group with the REPOSITORY_CREATE permission.
After confirming you have the proper permissions, generate an auth token for your user. Be sure to take a copy of the token as you will not be able to access it again.
In the OCI console, navigate to the Developer Services | Registry (OCIR) tab, and select the OCI region to which you would like to push the image. This should be the same region into which you provisioned your OKE cluster.
Log into the OCI registry
Log into the OCI registry in your development environment using the docker login command:
docker login <region-key>.ocir.io<region-key> corresponds to the code for the Oracle Cloud Infrastructure region you're using. See the this reference for the available regions and associated keys.
When prompted, enter your username in the format <tenancy_name>/<username>. When prompted, enter the auth token you copied earlier as the password.
Tag the container image
Next we'll tag the OCI CLI image that we're going to push to the OCI registry:
docker tag oci-fn-cron:latest <region-code>.ocir.io/<tenancy-name>/oci-cron/oci-fn-cron:latestPush the image to the OCI registry
And now we'll use the docker push command to push the conainer image to the OCI registry:
docker push <region-code>.ocir.io/<tenancy-name>/oci-cron/oci-fn-cron:latestWithin the OCI console Registry UI you will now be able to see the newly created repository & image.
4. Schedule the Kubernetes CronJob
On your development workstation create a file named oci-fn-cron.yaml with the following content:
kind: CronJob
apiVersion: batch/v1beta1
metadata:
  name: oci-functions-cron
spec:
  schedule: "*/5 * * * *"
  jobTemplate:
    spec:
      template:
        spec:
          containers:
          - name: oci-functions-cron
            image: <region-code>.ocir.io/<tenancy-name>/oci-cron/oci-fn-cron:latest
            command: ["/opt/rh/rh-python36/root/usr/bin/oci"]
            args: ["--debug", "fn", "function", "invoke", "--function-id", "<function-ocid>", "--file", "-", "--body", "-"]
            imagePullPolicy: Always
            volumeMounts:
            - name: oci-cli-config
              mountPath: "/root/.oci"
              readOnly: true
            ports:
            - containerPort: 9081
          restartPolicy: Never
          volumes:
          - name: oci-cli-config
            secret:
              secretName: oci-cli-config
              items:
              - key: config
                path: config
              - key: id_rsa_pri.pem
                path: ssh/id_rsa_pri.pem
Remember to update the following:
- Line 13 with your OCI
region-codeandtenancy-name - Line 15
function-ocidwith the OCID of the Oracle Function you wish to invoke
Save the file, and submit the CronJob with the following command:
kubectl apply -f cronJob.yamlVerifying CronJob operation
You can validate that your CronJob is functioning correctly by following this procedure:
1. Obtain the job execution history by entering the command:
kubectl get jobs --watchThe output will look similar to the following:
NAME                            COMPLETIONS   DURATION   AGE
oci-functions-cron-1575886560   1/1           43s        4m45s
oci-functions-cron-1575886680   1/1           34s        2m44s
oci-functions-cron-1575886800   1/1           35s        44s
2. Enter the following command to obtain the pod name associated with the scheduled job, replacing <job-name> with the job name received via the previous command output:
kubectl get pods --selector=job-name=<job-name> --output=jsonpath={.items[*].metadata.name}3. Enter the following command to obtain the logs associated with the executed CLI command, replacing <pod-name> with the pod name name received via the previous command output:
kubectl logs <pod-name>If your function was invoked correctly, the output will look similar to the following - which is the log data generated by the CLI running the fn function invoke command which we defined in the Kubernetes CronJob:
INFO:oci.base_client.140263433586560: 2019-12-09 21:54:04.502876: Request: GET https://functions.us-ashburn-1.oci.oraclecloud.com/20181201/functions/ocid1.fnfunc.oc1.iad.aaaaaaaaadfmkqscppi63jistu4t7au2veexg5in6lykzovzmvaja6vqmwsa
DEBUG:oci.base_client.140263433586560: 2019-12-09 21:54:04.601030: time elapsed for request 4AFF967835C440009D15F3CFAAC404D2: 0.0978535171598196
DEBUG:oci.base_client.140263433586560: 2019-12-09 21:54:04.601216: time elapsed in response: 0:00:00.092832
DEBUG:oci.base_client.140263433586560: 2019-12-09 21:54:04.601319: Response status: 200
DEBUG:oci.base_client.140263433586560: 2019-12-09 21:54:04.603549: python SDK time elapsed for deserializing: 0.0020453811157494783
DEBUG:oci.base_client.140263433586560: 2019-12-09 21:54:04.603681: Response returned
DEBUG:oci.base_client.140263433586560:time elapsed for request: 0.1009602730628103
INFO:oci.base_client.140263433271056: 2019-12-09 21:54:04.608421: Request: POST https://newg3h4jqoq.usashburn1.functions.oci.oraclecloud.com/20181201/functions/ocid1.fnfunc.oc1.iad.aaaaaaaaadfmkqscppi63jistu4t7au2veexg5in6lykzovzmvaja6vqmwsa/actions/invoke
DEBUG:oci.base_client.140263433271056: 2019-12-09 21:54:37.288483: time elapsed for request 7C625DE5724D4C3B8E26A771D3F7F87B: 32.679952513892204
DEBUG:oci.base_client.140263433271056: 2019-12-09 21:54:37.288662: time elapsed in response: 0:00:32.676453
DEBUG:oci.base_client.140263433271056: 2019-12-09 21:54:37.288778: Response status: 200
DEBUG:oci.base_client.140263433271056: 2019-12-09 21:54:37.288893: Response returned
DEBUG:oci.base_client.140263433271056:time elapsed for request: 32.68057371187024
Altering the CronJob Schedule
With Kubernetes, one CronJob object is like one line of a crontab (cron table) file. It runs a job periodically on a given schedule, written in Cron format. For the sake of example, the above CronJob object will invoke the Oracle Function every 5 minutes.
To have your function run on a different schedule - simply modify the schedule as defined on line 6 in oci-fn-cron.yaml, and resubmit the CronJob.
Scheduling Different CLI Operations
In the example solution we've scheduled the OCI CLI to invoke an Oracle Serverless Function on a regular interval.
Now that you have the solution in place, it's actually very easy to schedule additional Kubernetes CronJobs that execute different CLI commands.
All that's required is to create additional CronJob yaml files, in each updating the job name (line 4 in the example oci-fn-cron.yaml) and the OCI CLI command to execute via args (line 15 in the example oci-fn-cron.yaml) to suit your requirements.
The complete list of services supported by the OCI CLI is available here, and the range of possible use-cases is almost limitless!
Cover Photo by Paweł Czerwiński on Unsplash.