
This post demonstrates how to deploy and load balance a web application across multiple Amazon ECS Anywhere external instances, using the Traefik Proxy (Traefik) network load balancer.
Introduction
With Amazon ECS Anywhere, you can run and manage containers on any customer-managed infrastructure using the same cloud-based, fully managed, and highly scalable container orchestration service you use in AWS today. Amazon ECS Anywhere provides support for registering an external instance, such as an on-premises server or virtual machine (VM), to your Amazon ECS cluster. External instances are optimized for running applications that generate outbound traffic or process data, and can also be used to host applications that service inbound requests such as frontend web applications, microservices, or Application Programming Interfaces (APIs).

When using Amazon ECS Anywhere to manage applications that service inbound requests, it’s possible to configure an Amazon Elastic Containers Service (Amazon ECS) service to run and maintain a specified number of instances of a task definition simultaneously across multiple Amazon ECS external instances to provide increased capacity, availability, and reliability of your applications. In this scenario, deploying a load balancer to an external instance helps simplify the distribution of inbound traffic evenly between each of the instances that host an application.
This post we demonstrate how to deploy and load balance a web application across multiple Amazon ECS Anywhere external instances, using the Traefik Proxy (Traefik) network load balancer.
Traefik is an open-source cloud-native load balancer and reverse proxy application developed by the software company Traefik Labs. Traefik supports automatic service discovery and configuration for a variety of orchestrators, including Docker, Amazon ECS, Kubernetes, and Marathon. Traefik also provides support for encrypted traffic termination, automatic security certificate issuance and renewal, and additional load balancing capabilities such as circuit breakers, and rate limiting.
Solution overview
In reference to the Solution overview diagram, the solution demonstrated in this post has the following key characteristics:
- The load balanced web application is deployed by Amazon ECS Anywhere to multiple managed external instances.
- The web application is deployed as an Amazon ECS service
Whoami, and the associated task definition simultaneously runs four instances of the containerized whoami web application distributed across two separate external instances. - The Traefik load balancer is deployed as an Amazon ECS service
LoadBalancer, and is configured to load balance incoming HTTP requests evenly across all instances of the whoami web application using rule based traffic routing. - The solution implements the default Traefik load balancing algorithm, which is round robin with an equal weighting applied to each web application instance.

Traefik configuration
In reference to the Solution routing architecture diagram, the Traefik request routing and load balancing architecture is comprised of four major components: EntryPoint, Router, Service, and Provider.

EntryPoints are the network entry points into the Traefik load balancer, which define the port and protocol on which to listen for incoming network packets. In the reference solution, the LoadBalancer Traefik instance is configured with a single HTTP EntryPoint listening on TCP port 80.
Services are responsible for configuring how to reach the actual application endpoints that handle the incoming requests. In the reference solution, we create and configure a Traefik Service named lb-svc-whoami that‘s configured to use the inbuilt Amazon ECS provider. Via the inbuilt Amazon ECS provider, Traefik automatically enumerates active application endpoints via the Amazon ECS control plane and update its routing rules in real-time — dynamically load balancing incoming requests across the pool of active application instances which may expand or contract in response to factors such as fluctuating load, application failure, or updates.
Routers analyze incoming requests, using rules to decide which Service to forward any given request to. Forwarding rules provide the ability to match traffic based on request characteristics such as host, path, headers, and method. Two Routers have been implemented in the example solution, each configured to forward traffic to the Traefik Service lb-svc-whoami:
whoami-hostis configured with a host based rule, which forwards incoming requests to thelb-svc-whoamiservice when the request domain (i.e., host header value) matches “whoami.domain.com”.whoami-pathis configured with a path based rule, which forwards incoming requests to thelb-svc-whoamiservice when the HTTP request path matches “/whoami”.
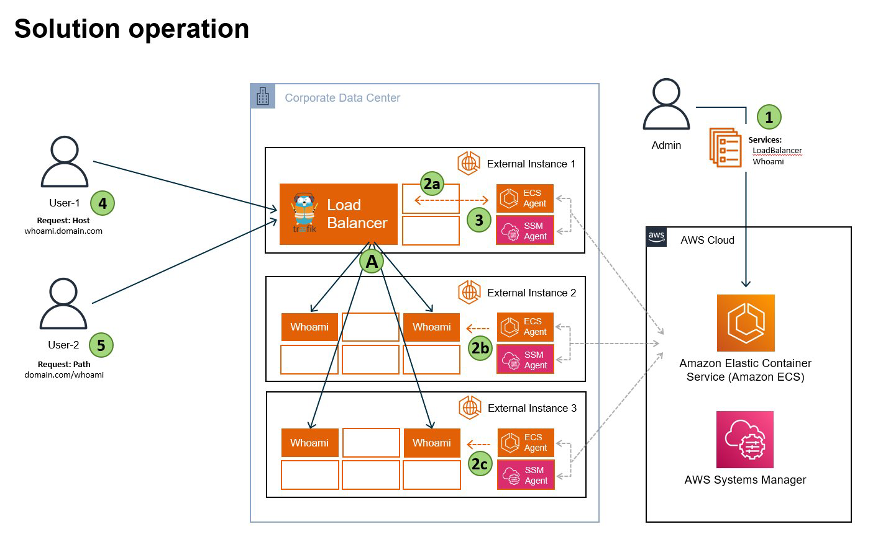
Solution operation
In reference to the Solution operation diagram, the solution demonstrated in this blog post has the following key operational characteristics:
- The Amazon ECS services
LoadBalancerandWhoamiare provisioned to the external instance by the Admin, who submits configuration and deployment requests to the Amazon ECS service in the AWS Region. - In communication with the Amazon ECS service, the Amazon ECS agent on the external instances launch the
LoadBalancerandWhoamiworkloads via the local Docker API. - In communication with the Amazon ECS service, the
LoadBalancerTraefik instance enumerates containers backing theWhoamiservice, and updates its routing table accordingly([2b], [2c]). - User-1 requests to “http://whoami.domain.com” match the Traefik host based route
whoami-hostand are load balanced across each of the whoami web application instances [A]. - User-2 request to “http://domain.com/whoami” match the Traefik path based route
whoami-pathand are load balanced across each of the whoami web application instances [A].
Walkthrough
In this section, I’ll guide you in the process of implementing the load balanced whoami web application to Amazon ECS Anywhere. We configure the solution in accordance with the deployment scenario detailed in the Solution overview section. The solution walkthrough proceeds in the following order of operation:
- Deploy the
LoadBalancerservice to external instance #1. - Deploy the
Whoamiservice to external instances #2, and #3. - Demonstrate host based load balancing to the
Whoamiservice. - Demonstrate path based load balancing to the
Whoamiservice. - Cleaning up.
Prerequisites
To complete this walkthrough, you will need the following prerequisites:
- An AWS account with necessary permissions to create the resources.
- The AWS Command Line Interface (AWS CLI) installed and configured.
- An Amazon ECS Cluster with three registered Amazon ECS Anywhere external instances.
- For each external instance you register with an Amazon ECS cluster, it requires the AWS Systems Manager (SSM) Agent, the Amazon ECS container agent, and Docker installed. To register the external instance to an Amazon ECS cluster, it must first be registered as an AWS Systems Manager managed instance. You can generate the comprehensive installation script in a few clicks on the Amazon ECS console. Follow the instructions as described here in the Amazon ECS product documentation.
- An AWS Identity and Access Management (AWS IAM) role provisioned with appropriate policy to permit the Traefik proxy to read the required Amazon ECS attributes. You can follow this link for instructions on creating an AWS IAM role and associated policy. The Amazon ECS Task IAM role requires the following policy configuration in order to read required Amazon ECS information.
{
    "Version": "2012-10-17",
    "Statement": [
        {
            "Sid": "TraefikECSReadAccess",
            "Effect": "Allow",
            "Action": [
                "ecs:ListClusters",
                "ecs:DescribeClusters",
                "ecs:ListTasks",
                "ecs:DescribeTasks",
                "ecs:DescribeContainerInstances",
                "ecs:DescribeTaskDefinition",
                "ec2:DescribeInstances",
                "ssm:DescribeInstanceInformation"
            ],
            "Resource": [
                "*"
            ]
        }
    ]
}
1. Assign roles to external instances using Amazon ECS custom attributes
You can add custom metadata to your container instances, known as attributes. Each attribute has a name and an optional string value. To assist in targeting the deployment of our Amazon ECS services to specific external instances, we assign our external instances a logical role using custom attributes. The custom attributes are used to configure task placement constraints.
One of the external instances is assigned the role of loadbalancer. By following this work instruction, add the following custom attribute to one of your external instances:
- Name =
role, Value =loadbalancer
The remaining two external instances are assigned the role of webserver. Add the following custom attribute to each of the remaining external instances:
- Name =
role, Value =webserver
2. Deploy the LoadBalancer service to the external instance
Next we deploy the Traefik load balancer. We first create an Amazon ECS task definition, which describes the container configuration. Then we deploy the task definition to an external instance as an Amazon ECS service.
The following is an example JSON task definition, which contains the required configuration to implement the Traefik load balancer. Some points to note:
- The Amazon ECS launch type compatibility is set to
EXTERNALto ensure correct operation on an external instance. - The task definition includes the placement constraint matching the
loadbalancercustom attribute value. - The Traefik web user interface has been enabled, and will be accessible via Transport Control Protocol (TCP) port 8080 on the external instance host IP address.
Note: Replace the string<TASK_ROLE_ARN>with the Amazon Resource Name (ARN) of the AWS IAM role configured with theTraefikECSReadAccesspolicy as configured in the prerequisites section.
{
    "family": "LoadBalancer",
    "cpu": "256",
    "memory": "128",
    "containerDefinitions": [
      {
        "name": "traefik",
        "image": "traefik:latest",
        "entryPoint": [],
        "portMappings": [
          {
            "hostPort": 80,
            "protocol": "tcp",
            "containerPort": 80
          },
          {
            "hostPort": 8080,
            "protocol": "tcp",
            "containerPort": 8080
          }
        ],
        "command": [
          "--api.dashboard=true",
          "--api.insecure=true",
          "--accesslog=true",
          "--providers.ecs.ecsAnywhere=true",
          "--providers.ecs.region=ap-southeast-2",
          "--providers.ecs.autoDiscoverClusters=true",
          "--providers.ecs.exposedByDefault=true"
        ]
      }
    ],
    "placementConstraints": [
      {
        "type": "memberOf",
        "expression": "attribute:role == loadbalancer"
      }
    ],
  "taskRoleArn": <TASK_ROLE_ARN>,
  "requiresCompatibilities": [
    "EXTERNAL"
  ]
}
Copy the example task definition JSON content to a file named “task-definition-LoadBalancer.json”, and register the task definition with your cluster using the following AWS CLI command:
aws ecs register-task-definition --cli-input-json file://task-definition-LoadBalancer.jsonNext, create the LoadBalancer service using the LoadBalancer task definition by running the following AWS CLI command.
Note: Replace the string <CLUSTER_NAME> with the target Amazon ECS cluster name. This should be the cluster with which the external instance is registered.aws ecs create-service \
--cluster <CLUSTER_NAME> \
--service-name LoadBalancer \
--task-definition LoadBalancer:1 \
--desired-count 1 \
--launch-type EXTERNAL
You can use the following AWS CLI command to validate that the service has deployed correctly.
aws ecs describe-services —cluster <CLUSTER_NAME> —services LoadBalancerThe Traefik load balancer is now running on the external instance. You can access the Traefik web user interface by browsing to the following URL.
Note: Replace the string <HOST_IP> with the target Amazon ECS external instance host IP address, or DNS hostname.http://<HOST_IP>:8080/dashboard/3. Deploy the Whoami service to the webserver external instances
Next we deploy the example web application. First we create an Amazon ECS task definition, which describes the web application container configuration. Then we’ll deploy the task definition to our external instances as an Amazon ECS service.
The following is an example JSON task definition, containing the required configuration to implement the whoami web application. Some points to note:
- The Amazon ECS launch type compatibility is set to
EXTERNALto ensure correct operation on an external instance. - The task definition includes the placement constraint matching the
webservercustom attribute value. - Docker label
traefik.http.routersis used to configure host and path based routing rules. - As the whoami container exposes the single TCP port 80, Docker label
traefik.http.services.whoamiis used to configure this port for private communication with the Traefik load balancer.
{
  "family": "Whoami",
  "cpu": "256",
  "memory": "128",
  "containerDefinitions": [
    {
      "name": "whoami",
      "image": "traefik/whoami:latest",
      "entryPoint": [],
      "portMappings": [
        {
          "hostPort": 0,
          "protocol": "tcp",
          "containerPort": 80
        }
      ],
      "command": [],
      "dockerLabels": {
        "traefik.http.services.whoami.loadbalancer.server.port": "80",
        "traefik.http.routers.whoami-host.rule": "Host(`whoami.domain.com`)",
        "traefik.http.routers.whoami-path.rule": "Path(`/whoami`)"
      }
    }
  ],
  "placementConstraints": [
    {
      "type": "memberOf",
      "expression": "attribute:role == webserver"
    }
  ],
  "volumes": [],
  "requiresCompatibilities": [
    "EXTERNAL"
  ]
}
Copy the example task definition JSON content to a file named “task-definition-Whoami.json”, and register the task definition with your cluster using the following AWS CLI command:
aws ecs register-task-definition --cli-input-json file://task-definition-Whoami.jsonThen create the Whoami service using the Whoami task definition by running the following AWS CLI command.
Note: The directive--desired count 4instructs the Amazon ECS service scheduler to schedule and maintain 4 running instances of the whoami task spread evenly across the twowebserverexternal instances.
Note: Replace the string <CLUSTER_NAME> with the desired Amazon ECS cluster name. This should be the cluster with which the external instance is registered.aws ecs create-service \
--cluster <CLUSTER_NAME> \
--service-name Whoami\
--task-definition Whoami:1 \
--desired-count 4 \
--launch-type EXTERNAL
You can use the following AWS CLI command to validate that the service has deployed correctly.
Note: Replace the string <CLUSTER_NAME> with the target Amazon ECS cluster name.aws ecs describe-services —cluster <CLUSTER_NAME> —services WhoamiThe whoami web application is now running on the external instances. You can use the Traefik web user interface to inspect the solution configuration. To do this, first browse to the following address in order to inspect the whoami service configuration.
Note: Replace the string <HOST_IP> with the target Amazon ECS external instance host IP address, or DNS hostname.http://<HOST_IP>:8080/dashboard/#/http/services/whoami@ecsPer the following illustration, the Traefik web user interface provides an overview of the major components comprising the whoami service.
- In the [1] Service Details section we see the service type as loadbalancer, using the Amazon ECS provider.
- In the [2] Servers section are the x4 whoami web application instances distributed equally across the two
webserverexternal instances, each listening on TCP port 80. - In the [3] Routers section the two Traefik routers
whoami-hostandwhoami-pathare listed with their respective host and path based routing rules, and association with the Servicewhoami.

With the solution now in place, let’s now validate the traffic routing behavior by sending HTTP requests to the whoami web application using both the path and host based routing rules.
4. Demonstrate host based load balancing to the Whoami service
Using a terminal emulator, let’s send x4 HTTP requests to the host “whoami.domain.com”.
Note: For name resolution to function in the test scenario, update the local hosts file on the test client machine or a DNS A record for host “whoami.domain.com” as associated with the LAN IP address of the loadbalancer external instance. If required this can also be exposed to the public internet via your preferred firewall/gateway solution and publicly resolvable DNS zone.Note: HTTP response data in the below examples has been truncated for brevity.
$ curl whoami.domain.com
Hostname: c87e8f82af9f
IP: 127.0.0.1
IP: 172.17.0.2
RemoteAddr: 192.168.1.115:42752
GET / HTTP/1.1
Host: whoami.domain.com

$ curl whoami.domain.com
Hostname: 618e18ed985a
IP: 127.0.0.1
IP: 172.17.0.3
RemoteAddr: 192.168.1.115:34496
GET / HTTP/1.1
Host: whoami.domain.com

$ curl whoami.domain.com
Hostname: 0fb436d99af7
IP: 127.0.0.1
IP: 172.17.0.3
RemoteAddr: 192.168.1.115:55168
GET / HTTP/1.1
Host: whoami.domain.com

$ curl whoami.domain.com
Hostname: ab91f6ec8bcc
IP: 127.0.0.1
IP: 172.17.0.2
RemoteAddr: 192.168.1.115:44678
GET / HTTP/1.1
Host: whoami.domain.com
The Hostname field in the curl response represents the container ID of the load balanced container responding to the HTTP request. We can see in the example output that the Traefik load balancer has forwarded each of the four HTTP requests evenly across each of the four whoami web application containers c87e8f82af9f, 618e18ed985a, 0fb436d99af7, and ab91f6ec8bcc by using the default round robin algorithm.
5. Demonstrate path based load balancing to the Whoami service
Next, using a terminal emulator send four HTTP requests to the resource <HOST_IP>/whoami.
Note: Replace the string <HOST_IP> with the target Amazon ECS external instance host IP address.$ curl <HOST_IP>/whoami
Hostname: c87e8f82af9f
IP: 127.0.0.1
IP: 172.17.0.2
RemoteAddr: 192.168.1.115:43674
GET /whoami HTTP/1.1
Host: 192.168.1.115
$ curl <HOST_IP>/whoami
Hostname: 618e18ed985a
IP: 127.0.0.1
IP: 172.17.0.3
RemoteAddr: 192.168.1.115:35418
GET /whoami HTTP/1.1
Host: 192.168.1.115
$ curl <HOST_IP>/whoami
Hostname: 0fb436d99af7
IP: 127.0.0.1
IP: 172.17.0.3
RemoteAddr: 192.168.1.115:56090
GET /whoami HTTP/1.1
Host: 192.168.1.115
$ curl <HOST_IP>/whoami
Hostname: ab91f6ec8bcc
IP: 127.0.0.1
IP: 172.17.0.2
RemoteAddr: 192.168.1.115:45552
GET /whoami HTTP/1.1
Host: 192.168.1.115
And again in accordance with our solution configuration, the Traefik load balancer has forwarded each of the four path-based HTTP requests across each of the individual whoami web application containers c87e8f82af9f, 618e18ed985a, 0fb436d99af7, and ab91f6ec8bcc by using the round robin algorithm.
Cleaning up
In order to avoid incurring future charges, follow these procedures to delete the resources provisioned during the work instruction.
First, let’s delete the Amazon ECS services. To do so, run the following AWS CLI commands.
Note: Replace the string <CLUSTER_NAME> with the desired Amazon ECS cluster name. This should be the cluster with which the external instance is registered.aws ecs delete-service --cluster <CLUSTER_NAME> --service Whoami --force
aws ecs delete-service --cluster <CLUSTER_NAME> --service LoadBalancer --force
Next, we deregister the external instances from the Amazon ECS cluster. To do so, run the following AWS CLI command for each external instance.
Note: Replace the string<CLUSTER_NAME>with the desired Amazon ECS cluster name. This should be the cluster with which the external instance is registered. Replace the string<INSTANCE_NAME>with the name of the external instance to be deregistered.
aws ecs deregister-container-instance \
    --cluster <CLUSTER_NAME> \
    --container-instance <INSTANCE_NAME>
    --force
To delete the Amazon ECS cluster, run the following AWS CLI command.
Note: Replace the string <CLUSTER_NAME> with the desired Amazon ECS cluster name.aws ecs delete-cluster --cluster <CLUSTER_NAME>Finally, follow this work instruction to delete the AWS IAM role and associated policy configured to permit the Traefik proxy to read required Amazon ECS attributes.
Conclusion
In this post, we showed you how to deploy and load balance a web application across multiple Amazon ECS Anywhere external instances, using the Traefik Proxy (Traefik) network load balancer. Implementing network load balancing for Amazon ECS Anywhere workloads such as frontend web applications, microservices, or APIs, is straightforward and effective when using the open source Traefik network load balancer. By incorporating the built-in Traefik ECS provider, you are able to dynamically discover and distribute requests across pools of active application instances as they expand or contract in response to factors such as fluctuating load, application failure, or updates. Additional support for encrypted traffic termination, automatic security certificate issuance and renewal, and additional load balancing capabilities such as circuit breakers, and rate limiting offer a comprehensive toolkit for securing and scaling your distributed workloads with Amazon ECS Anywhere.
To learn more, see Amazon ECS Anywhere in the Amazon ECS Developer Guide, and we encourage you to give it a try with the Amazon ECS Anywhere workshop as a next step.
Photo by Igor Omilaev on Unsplash.